[VIDEO DEVICES][HTPC]
myHD HDTV Tuner Card
<< Back to HTPC
Introduction | Hardware | Software | Performance | Image
Captures
INSTALLATION - HARDWARE
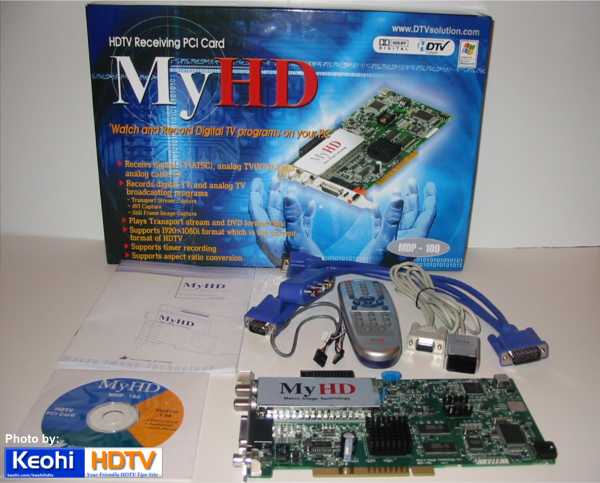
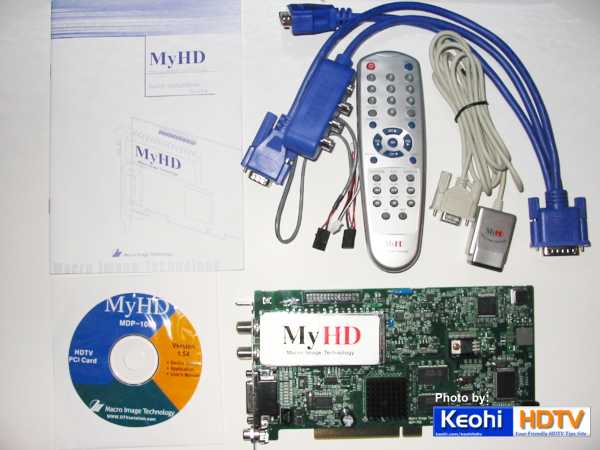
The product comes with just about every piece of equipment you'd need to connect your
computer to your hdtv set. It comes with the card itself, an installation cd, remote
control and receiver, audio card jumper cable, and a vga loop through cable. It even comes
with the batteries for the remote. And most important of course is the installation
manual.
Before installing the card, one has to ensure a few minimum pc
requirements for successfull installation. The PC needs to be at least a Pentium II 333MHz
or faster; or a Pentium III 800MHz if you want to take advantage of the card's record and
playback feature. It needs to have at least 64MB of RAM, one available PCI slot;
running Windows OS (98SE and up); one available serial port (9 pin); has DirectX V7.0 or
higher; and has a DirectX compatible VGA card.
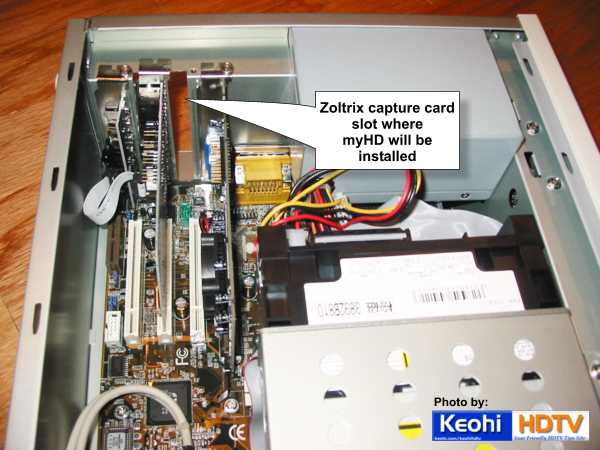
My HTPC met most of the minimum
requirements except for a couple of things. The HTPC's very small footprint meant
compromising on a number of things. This included a very limited number of expansion
slots in the design. Looking at the cards installed, it was easy to identify the
capture card used for Dscaler as the card to be sacrificed. I rarely use Dscaler so
out it went. I can easily reinstall it if need be. The only other thing I had to do
was to upgrade DirectX from 6.0 to 8.1. My htpc came with 6.0 DirectX., so I downloaded
the latest and greatest from Microsoft. DirectX 9 didn't quite work on my HTPC so I had to
scale it back to 8.1 which worked.
Installation of the card itself was straightforward. The myHD installation manual
is very well written. It literally steps you through the process with easy to follow
instructions. If you follow the the directions carefully, the instalation will be simple
and uneventful. Below are what I did to install the product.
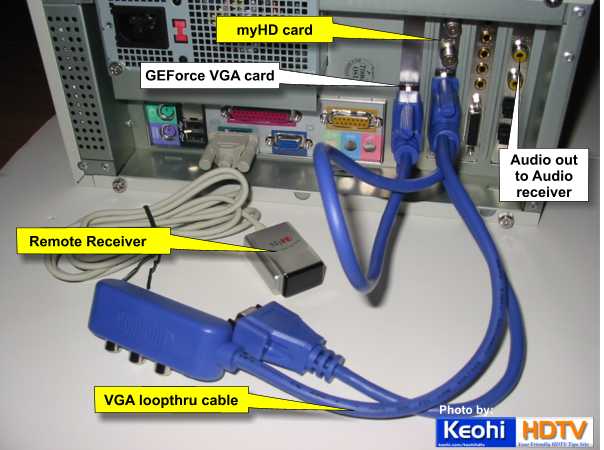
- Installed pci card securely into the available slot.
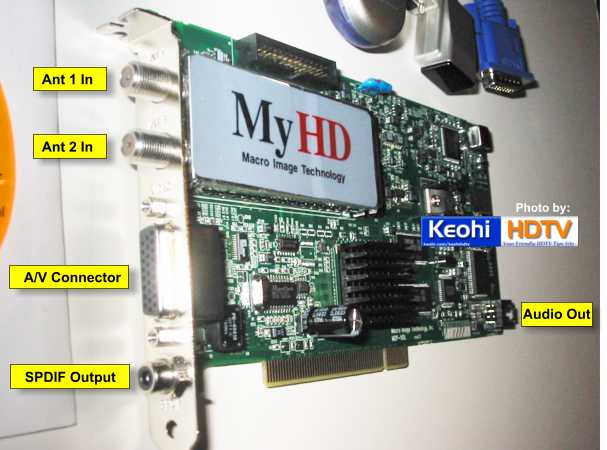
- Connected the myHD card audio output on the back edge of the card to the Zoltrix sound
card using the provided audio jumper cable.
Connecting the myHD card to the audio card will provide a single audio out from the HTPC
for both the myHD for local broadcasts and WinDVD for DVD playback. This eliminates
the need for a separate audio out for myHD and another for WinDVD. I did test the
audio output of the myHD card and it works. The jumpered configuration however is
cleaner and simpler. There are settings in the myHD software that need to be
adjusted to match this hardware configuration (see Software
page).
- That's about it with work inside the pc. Simple huh?
| Click on thumbnail to view larger picture |
 |
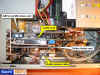 |
Now on to the connections outside the pc.
- I connected the antenna coaxial cable to ANT1. Next was connecting the
infrared remote receiver to the 9-pin serial port. I faced the remote receiver towards the
seating area where the myHD remote control would be used.
- The installation instructions shows two configuration options for connecting the HTPC to
the HDTV set.
Option 1 is for dual monitor configuration where you have a computer monitor driven by the
pc graphics card and the HDTV set driven by the myHD card. This configuration displays the
windows desktop with the myHD overlay screen and controls on the pc monitor while the
full-screen output of the myHD card is displayed on the HDTV set.
Options 2 is for a single monitor configuration where the myHD on screen overlay on the
windows desktop and full-screen can be toggled on the monitor. Using the loop
through cable, I connected one end to the myHD A/V connector, another to the graphics card
output, and then the last connector going to the HDTV set.
Although I have a 17" pc monitor with my htpc (for conducting htpc tests), I chose
configuration option 2. This simplifies administering myHD configuration changes. Since I
sit about 12 ft from the screen with the htpc and monitor next to it, it would be very
difficult to see the overlay on the windows desktop even with my 20/20 vision. With option
2, I can switch back and forth between full screen and windows desktop right on the big
screen.
Click on thumbnail to view larger picture |
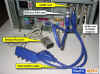
|
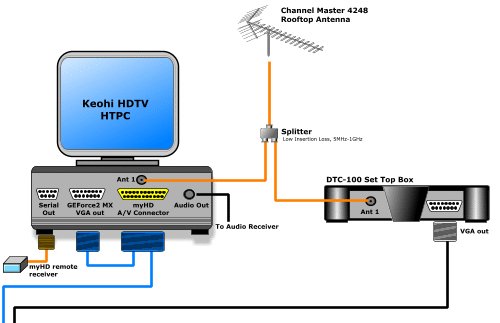
CONNECTION TO TV
Before I get into how it works, I need to address connection of the HTPC to my HDTV
set. Although mentioned in my htpc review, it needs repeating here since input terminals
on one's set will dictate how the HTPC will be connected and how the software will be
configured.
I've always only had the RCA DTC-100 as my HD tuner. Introducing the myHD into the
equation luckily was a simple and almost painless architecture change.
Local over the air HD broadcast is received by the Channel Master 4248 antenna and sent
down the coaxial transmission line to the DTC-100. With the addition of the myHD, I
installed a high performance low loss splitter which splits the HD feed to both the
DTC-100 and the HTPC.
Both the DTC-100 and HTPC output RGBHV via the D-sub 15-pin port. Since my set
has component inputs only, I had to connect them through separate RGB to Component
transcoders. If your set has RGBHV inputs, then you don't need the transcoder.
You simply connect the myHD output via the right cable, whether it be a VGA or
breakout cable.
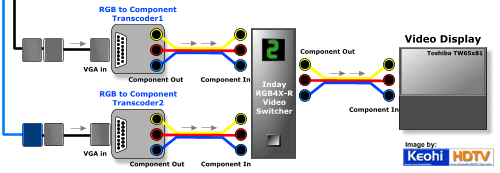
The component outs from each of the transcoders are then channelled to the Inday
RGB4X-R video switcher which then deliver the signal to a single component input of the
HDTV set. I could have bypassed the switcher and fed the DTC and the HTPC outs to
separate component inputs of the TV. But since I wanted to be able to quickly switch
back and forth between the two devices for visual comparison, the Inday was the logical
way to go. Doing otherwise would have made the visual comparison impossible using
the Toshiba's standard slow video input switch which cycles through all the inputs.
Below is how the system is hooked up.
|