[LEARN ABOUT][GENERAL
TIPS]
DVHS ON A BUDGET or “How To Tape DVHS
Onto SVHS/VHS Tape The Cheap And Safe Way”
Tip by Michael TLV:
First a little bit of history about the Super VHS format (SVHS) that was introduced by
JVC in 1987. This format was an upgrade to the existing VHS format as it was designed to
record at a higher horizontal resolution than VHS. The boost to detail came in the
luminance domain (a.k.a. the black and white information) while the colour resolution was
still unchanged from VHS. The horizontal resolution specification for SVHS was greater
than 400 lines compared to VHS which was 240 lines. Strangely the increased detail in the
black and white information resulted in an image that looked like the colour saturation
was low all the time.
(In practice, most consumer SVHS VCR’s typically recorded only 360 to 380 lines at
the best SP speed so they were not quite as good as the specification for the new format;
still a large leap in image quality though. Some of the lesser SVHS VCR’s of the time
were actually down in the 340 line range for recorded horizontal resolution. The current
JVC higher end SVHS units (circa 2001) record greater than 420 lines while their budget
units are still in the 350 line range.)
Since the inception of the SVHS format, I have owned 13 of these VCR’s including
three RCAs, two Toshibas, four JVC’s, two Mitsubishi’s, one Magnavox, and one
Panasonic.
The catch with the SVHS format was that the improved format required a special tape for
the higher resolution recording, thus the SVHS tape was born. Regular VHS tapes could not
be used to record in the SVHS mode because the cassette shell design prevented it. The
SVHS tapes were and actually are simply a higher grade of VHS tape and nothing more.
Tape Quality Hierarchy is as follows:
- Std Grade
- High Grade
- Hi-Fi Grade
- Pro Grade
- Industrial Professional Grade (Probably SVHS quality)
- SVHS
- Industrial Grade SVHS
- Now DVHS
The format required the higher grade tapes to guarantee a certain recorded quality.
Astute enthusiasts quickly figured out that the difference between the two types of tape
from a cassette design standpoint was nothing more than a small recognition hole
“drilled/moded” on the bottom of the SVHS cassette. A sensor within the SVHS VCR
would detect the presence of the hole and permit the recording of SVHS signals on the
tape.
Well, of course in these early days of the format, the SVHS tapes were simply far more
expensive than regular VHS tapes. Even in the early 1990’s the SVHS tapes were $10
compared to $2.50 for a good TDK standard grade VHS tape. For people that loved to archive
their TV programs and maximize the recorded quality, SVHS was the only way to go.
Unfortunately, the six (6) hour EP speed in SVHS while superior in detail, was still just
as unreliable when it came to archiving important tapes. So the SVHS enthusiast was stuck
with buying the expensive SVHS tapes and using the SP speed.
Early in the life of the format, enthusiasts like myself started to experiment with VHS
tape formulations at SVHS quality. We found that we could take a drill and put a similar
“recognition hole” into a standard VHS cassette and the SVHS VCR would then see
this tape as an SVHS tape. People used drills and soldering irons to create these holes in
the VHS cassettes and suddenly they were able to archive many more programs far more cost
effectively and at far greater image quality.
Taping SVHS signals onto a typical cheap VHS tape resulted in a higher resolution image
that was viewable, but would never be mistaken for true SVHS taped images. The images were
grainy … and very much so. As one went up the VHS tape quality chain, the SVHS images
rapidly approached the quality of the true SVHS tapes. The challenge in those days was to
find the right standard grade VHS formulation that came closest to the true SVHS quality.
These were readily found in TDK standard grade tapes at the time.
So with this history behind us, we come to the new format of DVHS for HD recording and
once more we have the dilemma of expensive DVHS tapes and the need to keep the quality
while minimizing the dollars that we have to spend on premium tape.
Drilling holes into the cassette shells was considered a bad idea even at the time we
tried it. (Plastic shavings) Ditto for the soldering iron. There had to be a better way
than this messy endeavour. This led us to open up the first SVHS VCR’s to look
closely at the so called recognition devices in there. It did not take long to see that
the so called “recognition pin” was merely a spring loaded plastic device about
six millimetres tall with a diameter of two or three millimetres. When the spring was
depressed by the VHS cassette, SVHS mode was disabled. When the spring was not disturbed,
SVHS was fully capable.
So what was to stop us from taking a small knife or pair of scissors to cut off the
first four millimetres of this plastic pin? Snip ….
After this minor bit of surgery, all VHS tapes inserted into the SVHS player were now
recognized by the VCR as being SVHS tapes (albeit poor quality ones.) If we still wanted
to record in regular crappy VHS, we would simply manually shut off the SVHS mode. Simple
as that.
So back to DVHS …
What makes these DVHS tapes so special that we have to use them for DVHS recordings?
Why cannot we use SVHS tapes instead, just to see what happens? Well, aside from the fact
that DVHS tapes are pretty much just HG style SVHS tapes, not much more special about them
except … another recognition hole.
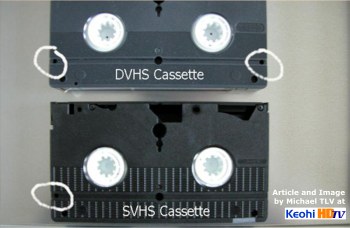
I have included some pictures of the cassette shell design of a typical SVHS tape and a
DVHS tape. Notice the two holes on the DVHS cassette and the single hole on the SVHS
cassette. The matching hole permits DVHS tapes to handle SVHS signals. The odd hole is
what separates DVHS from SVHS. (Exhibit 1)
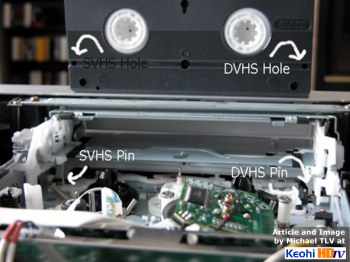
For the pictures here, I am using the current JVC DVHS D-Theater VCR and I will show
you where these recognition pins are located. The first VCR image is of the back of the
unit. (Exhibit 2) The cover needs to be removed. There are five screws securing the cover,
two on each side and one small black on the back.

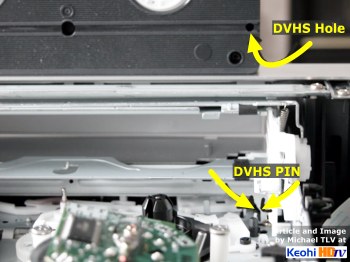
For this next picture, I have circled where the two recognition pins are located in the
unit. (Exhibit 3) Look for the one specific to the DVHS tape and cut the top 4 to 5 mm of
the pin off. This should take about 30 sec. once the cover comes off. Please disconnect
all power to the VCR when you are attempting this. If your hand slips, you could short
circuit the VCR and that would be your fault.
You do not need to do this to the SVHS pin on the other side since the VCR has SVHS-ET
capability for recording SVHS on VHS tapes. (What a way to try to add life back into a
format by disabling their own pin and offering it to the buying public as a new improved
feature.) They spent years telling us that it was bad to record SVHS on a VHS tape …
and then suddenly it was okay. SVHS-ET technology.
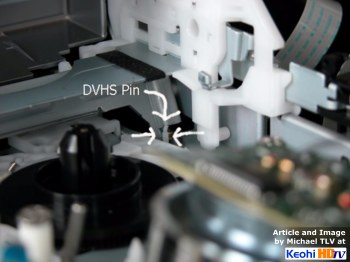
In case you get confused about which pin is which, this last picture (Exhibit 4) props
up a DVHS tape with the corresponding hole.
Once you do this, try to fish out the small plastic piece that is cut off. Then put the
unit back together. Now all tapes are DVHS tapes. Most SVHS tapes should work just fine
with the DVHS signal. I’ve used both T-120 and T-160 SVHS tapes with no problems.
It is surmised that the true DVHS tapes would likely stand up to repeated plays far
better than the SVHS substitutes. Something akin to a DVHS tape being played back 100
times without significant drop outs versus the SVHS tape starting to show more digital
degradation after 70 play cycles of the same program. (Numbers are completely made up.)
If you don’t want DVHS mode recorded on the SVHS tape, simply select the SP or EP
speeds instead.
Playback wise, the signal selection process of the VCR is entirely automated. The VCR
will identify the signal type of the tape and play it back in the original recorded form.
Regards
Michael @ The Laser Video Experience
|
