[EXPERT TIPS][MICHAEL
TLV]
Lenstriping Technique
(Grayscale vs. Screen Location)
<< Back to Michael TLV Tips
CAUTION: Although the procedure can vastly improve
the image on your set, it is best for professionals/experienced to perform the
procedure. If not done properly, it can potentially and irrevocably damage your set.
This by the way is also the fix for the problem described as red band on the right side
and/or blue band on the left side of the screen running from the top to the bottom of the
screen.
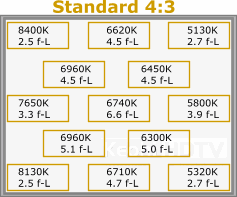
"It just gets stranger and stranger sometimes. The latest test was conducted after
Tom H wondered about mapping the grayscale at various points on the screen.
For this test, I used the VE disc and the 75% Gray frame. This was a random selection
of what was available and the information is specific only to my TP61H95, however it
should give you an idea of how colour temperature behaves through the entire screen area.
For this test, I also took light readings with the colour analyzer and multiplied the
result by 3x to get a relatively accurate reading. I've presented the results based on the
4:3 layout of the screen.

Position wise, the three CRT's are placed Red/Green/Blue from left to right. Blue is
aimed at the left side of the screen (hence it is more blue), red is aimed at the right
side of the screen (hence it is more red).
Interesting information to chew on ...
I don't know the exact behavior of the grayscale on a 16:9 set, but I will map that one
out eventually.
Additional Tips from Guy Kuo
Below is Guy Kuo's tip on getting the grayscale "under control".
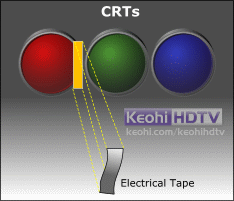
"One trick I have used for improving side to side color uniformity in RPTV's is to
use a small strip of black material to shade the red and blue lenses. This roughly
approximates what more expensive FPTV's can do with shading controls.
It takes some experimentation to get the proper width and position for the strip.
Somewhere around 1 cm wide and positioned just in front of the lens does the trick. The
strip needs to be about 1/3 to 1/4 of the way in from the most peripheral edge of the lens
and arranged perpendiclar to the front face of the screen. Tough to describe without a
picture.
Imagine you are striping the left lens. The strip would be taped over the lens from the
10:30 to 7:30 positions viewed from the top of the lens. The close proximity to the lens
diffuses the shadow cast by the stripe. By placing it off center of th lense, you get more
shadowing on one side of the screen than the other. If you get the width and position just
right, you make a huge dent in side to side color shift. There is of course, a slight
decrease in light output and you'll have to redo overall white balance.
The RGB delta display of your colorimeter can help guide how much stripe to leave. Just
check the deltas on each side of the screen and adjust the strips to even out red and blue
side to side. You won't get it completely evened out, but you'll end up with a lot less
color shift."
When asked is he was covering part of the projected area, Guy responds:
"Yes, I'm masking the projected light. If you are looking directly into the left
lens, imagine the face of a clock superimposed on the lens. For the left lens the stripe
runs from the the 7:30 to 10:30 positions of the clock face. For the right lens, the
stripe would run across the 1:30 and 4:30 positions. Yes, right across the outer portion
of the lenses. Not right at the edge but leaving some light from the lens edge. The stripe
cuts off part of the light to dim the portion of the screen which is overly lit by the
lens.
If you end up using tape, it may be a good idea to put a reversed piece on the portion
which overlies the lens. That way there won't be a risk of the tape's adhesive getting on
the lens should it sag or come loose."
In response to suggestions that the orientation of the stripes should be reversed, Guy
states below:
"I've intentionally, left the lens striping procedure as originally written
because it reduces the intensity of the gun on the same side of the screen as the stripe.
On most projectors, the screen is more brightly illuminated on the same side as the gun
and that is the side which need attenuation. It is possible to run into the opposite
situation but one should evaluate the optics and color shift of each display before going
to the opposite side of the lens.
Generically one should display a flat field and see the direction of the color shift.
Cover the inner then the outer half of a lens. Does it dim the same or opposite side of
the problematically brighter side? Now one knows which side needs to be striped. Apply the
stripe on the side of the lens which dims the side of the screen for dominated by that
color."
Follow up from Michael TLV
"Greetings
I did the tape test this evening on the red and blue guns. The results here are simply
my first pass at it, but it does show most promising results. Many thanks to Guy Kuo for
this "fix."

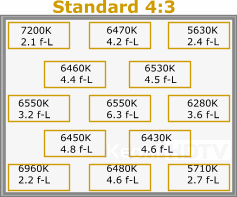
Tape on the Red Gun
The set up is the same as before using a 75 ire field. The colour temperature readings
are slightly different from last time because I recalibrated the set to get even closer to
D6500.
So without any further delay, the results:

The following results were achieved with standard 1/2 inch electrical tape placed on
the inside rim of the red and blue crt's. This was only a test. I'm sure if I increase the
amount tape coverage, the temps on both sides will get closer to the norm. That's next.
As with everything else ... YMMV.
|