[BRAND
SPECIFIC][PHILIPS]
Convergence and Geometry
<< Back to Philips Tips
Tip from GB: Completely read the Setup section before performing any of the
following adjustments.
Setup
There are three new High Definition Ready chassis’s for the 2000/2001 model years:
| CHASSIS |
SCREEN
SIZE |
ASPECT
RATIO |
TEMPLATE
USED |
| DPTV210 |
55" |
16X9 |
ST4165 |
| DPTV215 |
60" |
4X3 |
ST4166 |
| DPTV220 |
60" |
16X9 |
ST4167 |
All of these sets incorporate a Digital Convergence panel. These
chassis’s have six different display modes each containing separate Convergence and
Geometry settings. Data for the convergence settings is contained within the EEPROM
located on the Convergence panel. The Convergence data for the six modes is stored on the
EEPROM on the Convergence panel. The Geometry data is stored on the EEPROM located on the
Microprocessor panel. It will be necessary to perform convergence and geometry alignments
for each of the six modes.
Geometry adjustment settings are stored on the EEPROM located on the Whole System
Control panel. Each display mode will contain different Geometry settings.
This adjustment procedure contains:
- Convergence Service mode
- Convergence Touch up
- Single Tube Replacement convergence
- Major Convergence
- Geometry Alignments
The Convergence touch up procedure is used to make minor adjustments to
convergence. The Single tube replacement convergence is necessary when a CRT has
been replaced. The Major Convergence alignment is necessary when the Convergence
panel has been replaced.
The Geometry alignments will be necessary when the Microprocessor panel or the Memory
IC on the Microprocessor panel has been replaced.
When performing convergence or geometry alignments, the correct signal must be applied
to the set. This is necessary to provide the correct horizontal and vertical sync to the
convergence panel.
Failure to provide the correct signal will result in an out of convergence picture when
the customer applies the correct signal to the set.
Table 1 shows the six different convergence and geometry modes with the horizontal and
vertical frequencies for each of those modes. The NTSC signal should be used when
adjusting the VGA Video NTSC mode. The set is placed in the NTSC mode by selecting one of
the Aux in or Antenna inputs. The VGA Video and NTSC settings use the same convergence and
geometry data. The NTSC signal is applied to a Line Doubler inside the set to produce
approximately 31.5 kHz horizontal. The Video setting overscans the picture as with a
normal NTSC set. The PC setting underscans the picture as in a computer monitor.
| MODE |
HORIZONTAL |
VERTICAL |
VGA-VIDEO-NTSC
(640X480) |
31.5 kHz |
60 Hz |
VGA-PC
(640X480) |
31.5 kHz |
60 Hz |
SVGA-VIDEO
(800X600) |
37.8 kHz |
60 Hz |
SVGA-PC
(800X600) |
37.8 kHz |
60 Hz |
HD-VIDEO
(1920X1080) |
33.75 kHz |
60 Hz |
HD-PC
(1920X1080) |
33.75 kHz |
60 Hz |
To select the display mode of the set, press the Source Select button on
the remote transmitter.
The following menu will appear.
- Ant A
- Ant B
- Aux 1 DVD video
- Aux 1 Y PB PR
- Aux 2 Video
- Aux 2 Y PB PR
- Aux 3 Video
- Aux 4 HD Y PB PR
- Aux 5 HD RGB-VGA
The first seven inputs are for the NTSC mode. When the Geometry and Convergence
alignments are performed in NTSC, the set is also aligned for the VGA mode. The Aux 4
input is for High Definition component input. This is for the HD Video and PC modes. The
Aux 5 input is the High Density “D” standard computer monitor input connection.
This is also the input for the VGA Video and PC modes, SVGA Video and PC modes, and the HD
Video and PC modes.
To set the mode for Aux 4 or Aux 5, press the Menu button on the remote, after
selecting Aux 4 or Aux 5. The following menu will appear.
- Picture
- Sound
- Feature
- Exit
Select “Feature” in the menu and the following menu will appear.
- Feature Menu
- Display Mode
- Display Format
- Sync Type
- Hor Phase
- BP Width
- Language
- Back
In the Display Mode, select VGA, SVGA, or HD as required. In Display Format, select
Video or PC as required.
Convergence Service mode
The remote transmitter for the set is required to perform a convergence alignment. Use
the customer menu to place the set in the mode requiring adjustment. A signal with the
correct frequencies for that mode must be applied to the set. If the complete System
Control circuit, High Voltage Scan panel, or CRT’s have been replaced, a Geometry and
Focus alignment should be performed before performing the Convergence alignment.
Using the remote transmitter, enter the following seven button sequence to activate the
convergence mode.
0-6-2-5-9-7-Menu
Upon entry into the convergence mode, the following menu will appear on screen.
MENU: GO TO SELECT PAGE
STATUS: EXIT WITHOUT SAVING
Select Menu and the following screen will appear.
DIGIT 1 SELECTS GREEN
DIGIT 2 SELECTS RED TO GREEN
DIGIT 3 SELECTS BLUE TO GREEN
DIGIT 4 SELECTS GREEN TO RED
DIGIT 5 SELECTS GREEN TO BLUE
DIGIT 6 LOAD DEFAULTS TO EEPROM
STATUS: EXIT WITHOUT SAVING
To save data, press “3” while in the adjustment screen. The following menu
will appear.
1: SAVES DATA TO EEPROM
2: GOTO SELECT PAGE AGAIN
STATUS: EXIT WITHOUT SAVING
If “6” is selected while in the “SELECT PAGE,” the following menu
will appear.
1: DON’T LOAD GOTO SELECT PAGE
7: LOAD DEFAULTS
STATUS: EXIT WITHOUT SAVING
NOTE: If “7” is selected, the convergence data for all modes will be
overwritten with
default values.
Convergence Touch Up Procedure
1. In the Customer menu, select the mode to be adjusted.
2. Connect the correct signal to the set for the mode being adjusted.
3. Enter the “Convergence Service mode” as described in the “Convergence
Service Mode Procedure.”
4. Select the desired color requiring adjustment.
NOTE: Do not select Green Geometry. This procedure is described under “Major
Convergence.” The correct screen geometry can only be achieved by using the
screen Template as described in the “Major Convergence” procedure.
5. The highlighted adjustment icon (the flashing black cross) should appear in the
upper left-hand corner of the screen. Make the necessary convergence adjustments
using the following remote keys.
- Press the Cursor-up Key to move the icon of the selected color up.
- Press the Cursor-down Key to move the icon of the selected color down.
- Press the Cursor-right Key to move the icon of the selected color right.
- Press the Cursor-left Key to move the icon of the selected color left.
6. Press the Menu button on the remote transmitter to sequence the Icon to the next
adjustment location. Positioning of the Icon to the desired adjustment location can
also be performed by use of the following buttons on the remote transmitter.
- To move the Icon upward on the screen press the number 2 button on the remote
transmitter.
- To move the Icon downward on the screen press the number 8 button on the remote
transmitter.
- To move the Icon to the right on the screen press the number 6 button on the remote
transmitter.
- To move the Icon to the left on the screen press the number 4 button on the remote
transmitter.
7. Upon completion of the Convergence alignment for the selected color, press the
number 3 button on the remote transmitter.
The following menu will appear on the screen.
1: SAVES DATA TO EEPROM
2: GOTO SELECT PAGE AGAIN
STATUS: EXIT WITHOUT SAVING
NOTE: If the Menu button is pressed while the Icon is in the lower right hand corner of
the screen, the “Select Page” menu will appear. To save the data, it will be
necessary to select an adjustment screen and then press “3” on the remote
transmitter.
8. Repeat steps 1 through 7 for other required convergence adjustments.
NOTE: Pressing STATUS EXIT on the remote transmitter will cause the set to exit the
convergence procedure. All adjustment settings will be lost.
Single Tube Replacement convergence
1. In the Customer menu, select the mode to be adjusted.
2. Connect the correct signal to the set for the mode being adjusted.
3. Enter the “Convergence Service mode” as described in the “Convergence
Service Mode Procedure.”
4. Select the desired color requiring adjustment. Example: If the Green Tube was
replaced, select “Green to Red.”
5. Using the Centering tabs on the CRT, move the center of the color being adjusted
over the reference color.
6. The highlighted adjustment icon (flashing black cross) should appear in the upper
left-hand corner of the screen.
Move the adjustment color onto the reference color using the following remote
transmitter buttons.
- Press the Cursor-up Key to move the icon of the selected color up.
- Press the Cursor-down Key to move the icon of the selected color down.
- Press the Cursor-right Key to move the icon of the selected color right.
- Press the Cursor-left Key to move the icon of the selected color left.
NOTE: It is possible that the cursor is to the left and above the display area of the
screen. In these cases it is necessary to press the Cursor right button on the remote
transmitter for up to but no more than four seconds. Then press the Cursor down button on
the remote transmitter for up to but no more than four seconds. Noise will be flashing
across the screen indicating that the Icon is moving.
7. Use the Menu button to move the Icon to the next adjustment point on the screen. For
major Convergence adjustments, it is recommended that the pre-defined sequence of
adjustment points be followed. The Convergence adjustments are highly interactive. It will
be necessary to make several passes to complete the convergence.
NOTE: Best results are obtained when the extreme left and extreme right rows are not
adjusted during the first two passes.
8. When the Convergence alignment procedure for the selected color is complete, press
the number 3 button on the remote transmitter. The following menu will appear.
1: SAVES DATA TO EEPROM
2: GOTO SELECT PAGE AGAIN
STATUS: EXIT WITHOUT SAVING
NOTE: If the Menu button is pressed while the Icon is in the lower right hand corner of
the screen, the “Select Page” menu will appear. To save the data, it will be
necessary to select an adjustment screen and then press “3” on the remote
transmitter.
9. Repeat steps 1 through 8 for other required Convergence. It will be necessary to
converge the set for each Mode.
NOTE: Pressing STATUS EXIT on the remote transmitter will cause the set to exit the
convergence procedure. All adjustment settings will be lost.
Major Convergence Alignment procedure
Major Convergence Alignment procedures are required when replacing the Digital
Convergence module or when all three CRT’s require replacement. If the Microprocessor
panel, EEPROM on the Microprocessor panel, or the High Voltage Scan panel has been
replaced, a Geometry adjustment should be performed first. The convergence procedure must
be performed in the following order to ensure satisfactory results.
A signal must be connected to the set for the Mode being adjusted.
1. Perform the CRT Centering Adjustment using the centering tabs around the yoke. It is
only necessary to perform this adjustment for one mode.
2. Align the convergence by first setting the Green Geometry using the Convergence
Template. Then follow with the Red and Blue Convergence Alignment placing these colors
onto the Green. It is not possible to obtain the correct screen geometry without using the
Template. This step must be repeated for all six Modes.
CRT Centering Adjustment
1. Place the Screen Template on the screen, making sure the edges of the template are
aligned with the edges of the screen.
2. Enter the Convergence mode as described in the Convergence Service Mode procedure.
3. Place a jumper across connector 1033 (WF Disable) on the Convergence panel. This
will defeat convergence drive.
4. Select “1” (Green Geometry) from the convergence Service Mode Menu.
5. Using the centering tabs of the Green yoke, center the crosshatch pattern onto the
center marker of the template.
6. Return to the Convergence Service Mode menu by selecting “3” on the remote
transmitter.
Select “2” to activate Red to Green Geometry. Repeat step 5 using the Red
yoke centering tabs.
7. Return to the Convergence Service Mode menu and select “3” to activate
Blue to Green convergence. Repeat step 5 using the Blue yoke centering tabs.
8. Press “3” on the remote transmitter to return to the Convergence Service
Mode menu. Select “1” to activate Green geometry. Remove the jumper from
connector 1033. Proceed to the Green Geometry adjustment. Do not repeat the CRT Centering
Adjustment for the other modes.
Green Geometry Adjustment
The Green Geometry must be accurately adjusted to achieve proper convergence and screen
geometry. The Red and Blue displays will individually be made to conform to the Green.
1. Confirm CRT centering as described in CRT Screen Centering.
2. Attach the Screen Template.
3. Select “1” (Green Geometry) in the select menu. The Green Icon will be
positioned near the upper left-hand corner of the screen. If the Icon is not visible,
press the Cursor right button on the remote transmitter for up to but no more than four
seconds. Then press the Cursor down button on the remote transmitter for up to but no more
than four seconds. Noise will be flashing across the screen indicating that the Icon is
moving. Use the “M” (Menu) button to advance the Icon to the next location. Use
the cursor keys to move the grid onto the template. For best results, the extreme left and
right rows should not be adjusted during the first two passes. The bottom horizontal line
may be out of view. Press the cursor-up button for no more than 4 seconds to bring it up.
When the Icon reaches the lower right hand corner of the screen, pressing the
“M” button will cause the Select Screen to appear.
4. Press “1” to repeat the Green Geometry adjustment. Repeat the adjustment
of the Green Geometry until the green grid is aligned with the grid on the template.
5. While in the adjustment screen, press “3” to save the data. Pressing the
STATUS EXIT button on the remote transmitter will exit the convergence adjustment mode. If
this occurs, all new adjustments will be lost.
6. Remove the Template and adjust the Red and Blue grids to the Green.
7. It will be necessary to repeat the Green Geometry adjustment for each of the six
modes.
The correct signal for the mode being adjusted must be applied to the set.
Red and Blue Convergence Adjustment
The Red and Blue grids will be aligned to the Green grid after the Green Geometry
Adjustment has been completed. This alignment must be repeated for each of the six
convergence modes.
1. Remove the Screen Template.
2. Enter the “Red to Green Convergence” by selecting “2” on the
Select page.
3. The Red Icon will be positioned in the upper left-hand corner of the screen. If
convergence is too far out of range, it may not be visible In these cases it is necessary
to press the Cursor right button on the remote transmitter for up to but no more than four
seconds. Then press the Cursor down button on the remote transmitter for up to but no more
than four seconds. Noise will be flashing across the screen indicating that the Icon is
moving. Use the “M” (Menu) button to advance the Icon to the next location. For
best results, the extreme left and right rows should not be adjusted during the first two
passes. When adjusting, do not hold the cursor key down for more than 4 seconds in any
given direction. Pressing the “M” button after the Icon has reached the lower
right-hand corner will cause the select menu to appear.
4. Select “2” in the Select Menu if further convergence alignment is
necessary. If no further adjustment is necessary, press “3” while in the
adjustment screen to save the adjustment data.
5. Return to the Select Menu and select “3” for Blue to Green convergence.
Repeat the procedure in steps 3 and 4 to place the Blue grid onto the Green grid.
6. Repeat the Green Geometry and Red and Blue Convergence Alignment for the remaining
modes. The correct signal for the mode being adjusted must be applied to the set.
Geometry Alignments
A Geometry alignment is necessary when replacing the Microprocessor circuit, EEPROM in
the Microprocessor circuit, or the High Voltage scan panel. The Geometry settings for each
mode are stored in the EEPROM located in the Microprocessor circuit area. These settings
can be changed in the Whole System Control (WSO) mode. The set must be in the mode being
adjusted before entering the service mode.
The following list shows the Registers and factory default values for Screen Geometry:
| Register
Number |
Description |
Register
Value |
| 16 |
IIOR POS |
IF |
| 20 |
EW PIN |
IF |
| 21 |
SIDE TRAP |
IF |
| 22 |
WIDTH |
IF |
| 23 |
HEIGHT |
I6 |
| 24 |
VSCORR |
IF |
| 25 |
VSHIFT |
IF |
1. Apply a crosshatch pattern to the set with the correct sync signals.
Refer to the Setup section.
2. Place the set in the mode to be adjusted, VGA, SVGA, or HD. The Geometry must be
adjusted for each mode.
3. Select the Video format. The NTSC mode should be used for the VGA Video mode. If the
NTSC mode is used with chassis DPTV210 or DPTV220, the set must be placed in the 16 by 9
mode before entering the service mode. The DPTV215 chassis must be placed in the 4 by 3
mode.
4. Defeat the Convergence drive by shorting the two Pin connector 1033, WF Disable, on
the Convergence panel.
5. If the CRT’s have been changed, Screen Centering should be performed at this
time.
6. Enter the Whole System Service mode by entering 0-6-2-5-9-6-Menu.
7. Adjust the Screen Geometry Registers to align the Screen Geometry (edges of raster)
as shown in Figure A.
8. Remove the short from connector 1033 on the Convergence panel.
9. A Major Convergence or Convergence Touch Up may be required at this point.
10. Repeat the adjustment in number 2 with the PC format selected.
11. Adjust the Screen Geometry Registers to align the Screen Geometry (edges of raster)
as shown in Figure B.
FIGURE A
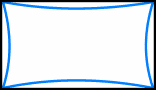
FIGURE B

|
